When we create a Maven project or TestNG project or any Java project, we create a workspace and provide space to our local system for code commit and execution. We don’t need to worry about any kind of specific configuration while storing our code at the local system, but we need to take care of some configuration while integration with cloud repository, like Github repository. Today we are going to discuss Github repository creation and its integration with Eclipse.
What is a Software Repository?
A software repository is a central storage system where all the revised version of the code is stored, retrieved and changes made when it is required. Colloquially, a repository is called repo. Examples are Github, Bitbucket, Stash, etc.
Don’t Miss: How to connect database in Selenium using JDBC?
Types of Repository
A repository is of two types which are listed below:
- Public: A public repository is accessible to all without any restriction.
- Private: A private repository has limited access based on the permission granted by the administrator. We require an authorization code to access private repository.
What is GitHub?
GitHub is a project hosting service to work in a collaboration with team. It is also a version control system (VCS); In simple word, GitHub is a central repository where we commit our code. It is built on the Git which is a version control software.
Differences between Git and GitHub
Some of the major differences between Git and GitHub are listed below:
| Git | GitHub |
| 1. It is a version control software | 1. It is built at the top of the Git |
| 2. It is a software | 2. It is a website, a brand name and service provider |
| 3. Local installation file | 3. Cloud-based platform |
| 4. Primarily a command line tool. Eg: Git Bash | 4. Web-administered tool |
| 5. The desktop interface is called as Git GUI | 5. The desktop interface is called as GitHub Desktop |
Terminologies used while using GitHub Repository
Some of the terminologies used while working with GitHub are as below:
Repository
- It is itself a repository
- A GitHub repository should have the license file and README file as well
- It is used to keep source code and project files like Documents, data, etc
Branch
- A branch created at GitHub repository is treated as the next version of the code
- The default branch is called- master
- A newly created branch is the copy of the master by default
- We merge branch to the master branch after making changes to the code
Commits
- Any changes in the code are termed as commits
- Every commit should go with the appropriate comment
Push and Pull Requests
- After commit, we push code from the Eclipse or Git SVN or Git Bash
- We can directly commit code at GitHub Repository (No Push required) through its portal
- With pull request, we download the latest version of the code to our local repo
- The difference in changes are shown by colors on a pull request
Clone
- Clone used to create the local version of the central repository
How to create a GitHub repository?
Let’s discuss the steps to create a GitHub repository. We can either create a public or private repository. The private repository is the paid service as it provides restricted code sharing access. Here are some of the steps to create a new GitHub repository:
Step# 1: Create an account at GitHub Portal
Go to www.github.com and create a new account there.
Step# 2: Add New Repository
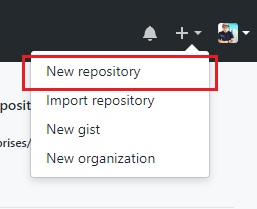
Find your account at the top right corner. There you see ‘plus (+)’ button. Click on it and then click on New repository option. See image below:
Step# 3: Create a New Repository
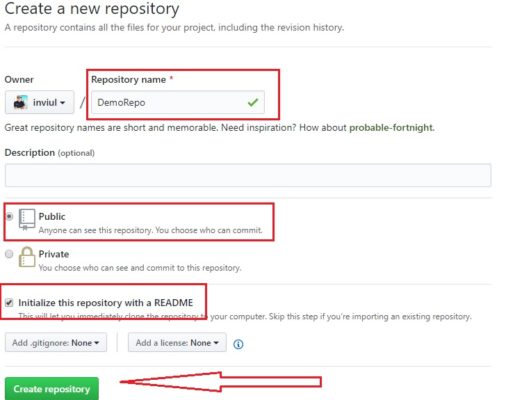
You land at Create a new Repository page. Here you fill details like Repository name, type of repository, check README file initialization then finally click on Create repository. See image below:
Step# 4: Validate New GitHub Repository
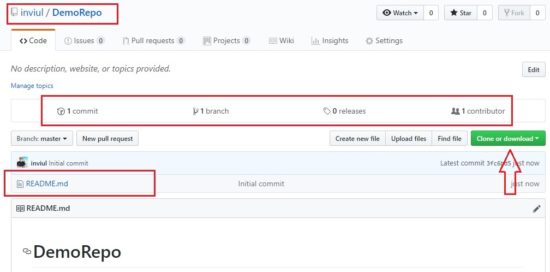
Finally, you land at your new GitHub repository page with default README.md file. You can edit it as per your convenience and commit it there. See image below:
This is how we create a new GitHub repository. Let’s discuss the integration of the GitHub repository with our Selenium project via Eclipse.
How to integrate GitHub repository with Eclipse for Selenium project?
Following steps guide you through the way to integrate Eclipse with your GitHub repository.
#1. Installation of Egit Plugin
Step# 1: Install EGit plugin in Eclipse
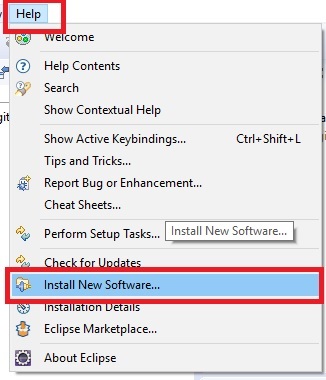
Go to Help Menu of Eclipse then click on Install new software. See image below:
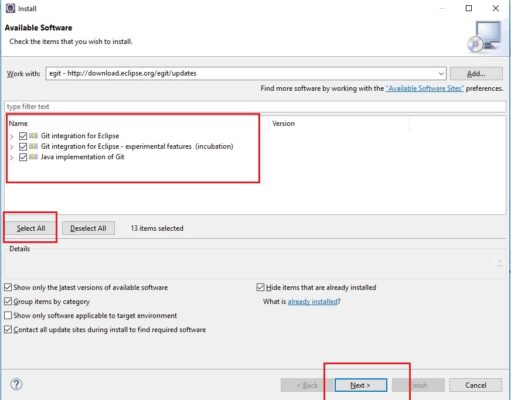
Step# 2: Find the Egit plugin and install it
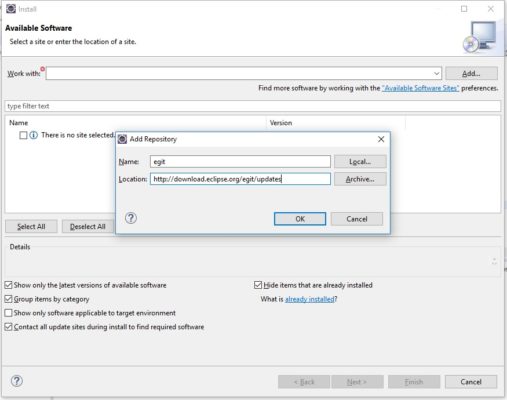
You will land to Installation window. Click on Add button and give name and Location of the plugin.
Name = Egit
Location = http://download.eclipse.org/egit/updates
See image below:
Step# 3: Review Licence and Proceed with Install Remediation Page
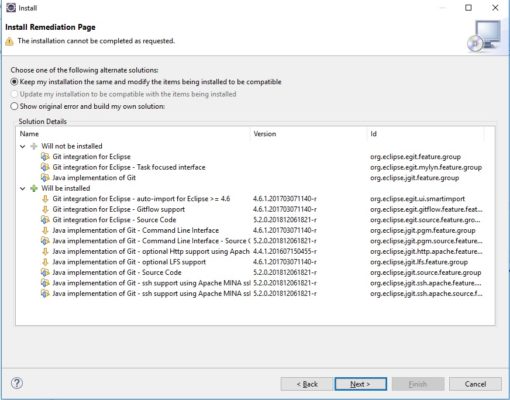
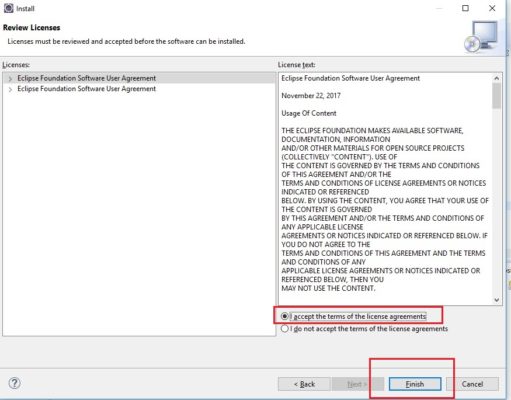
You will get Remediation page twice, click Next and proceed further. Then accept the license and Finish installation. Eclipse will prompt to restart, go for it. See image below.
#2. Connection of GitHub Repository with Local Repository
After successful installation of Egit plugin, next, we need to clone our Github repo with the local repository. Follow the below steps:
Step# 1: Go to Team
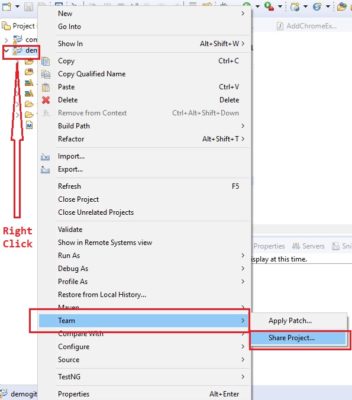
Right click on your project then go to Team and Select Share Project option. See image below:
Step# 2: Configure Git repository
Give the path to your local repository at Configure Git Repository window then click Finish. See image below:

Step# 3: Clone GitHub repository with Local repository
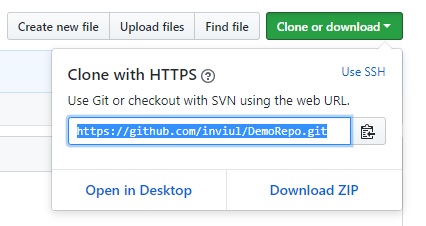
Now you need to clone the GitHub repo to your local. First, log in to your GitHub.com account and click on clone button and get the path to your GitHub repository. See image below:
Next, Go to Team then Click on Show in Repositories view. See image below:
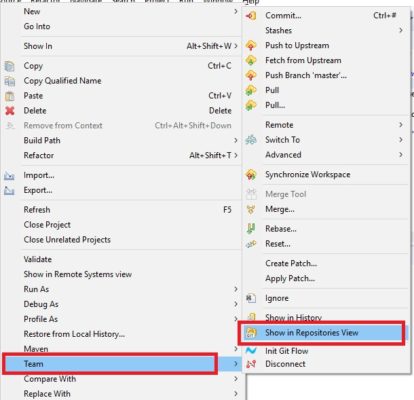
Then you get a Git Repositories pane as shown in the image below. Click on the third box which has pull-down arrow to clone GitHub repository.

After that, you get Clone Git Repository window. Here, give cloned path in URI with user name and password for authentication. See image below:

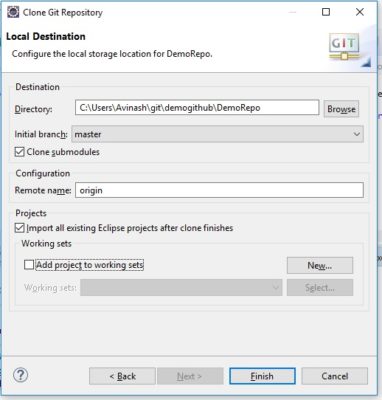
Then provide details of your local destination and click Finish. See image below:
We connected the GitHub repository with our Eclipse.
How to commit and push Selenium code to GitHub Repository from Eclipse?
Now it’s time to commit our Selenium code and push to the GitHub Repository. First, select the code which you want to push to the repo. After that follow below steps:
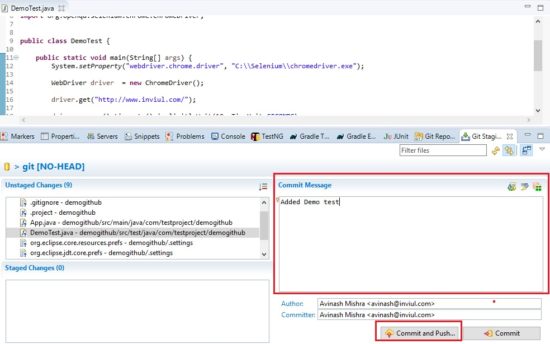
Step# 1: Select file to push then give commit message
After selecting the file, give some appropriate commit message and click on Commit and Push. See image below:
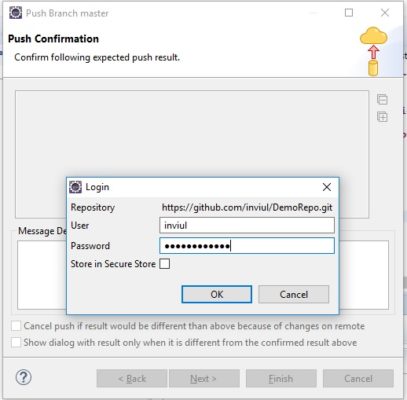
Step# 2: Push Authentication
Authenticate push operation by giving user name and password of your GitHub account. See image below:
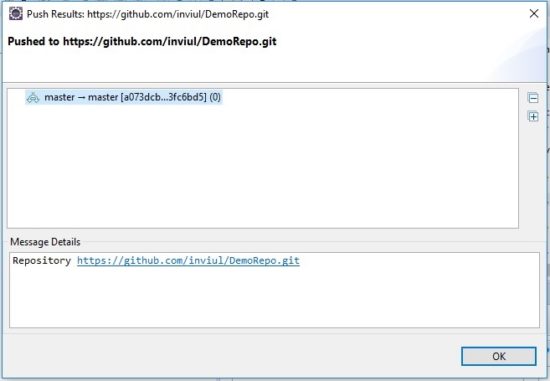
Step# 3: Validate Push Operation
Now you get the push confirmation window that it is successfully pushed with details of the branch. See image:
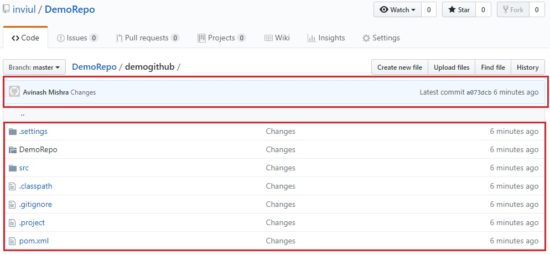
Step# 5: Validate Successful code merge at GitHub repository
Now login to your GitHub account and validate the changes which you have merged. See image below:
This was all about GitHub Repository configuration with Eclipse. Write in a comment below for any queries and don’t forget to join our Facebook group for quick updates.


Thanks for sharing such a useful information.
Simple way of explanation, Please elaborate difference between only commit and push commit option.
Thanks!
Only commit will commit your changes locally, whereas push commit will commit and push changes to remote repo.